Optimizely SaaS CMS + Coveo Search Page
Short on time but need a listing feature with filters, pagination, and sorting? Create a fully functional Coveo-powered search page driven by data from the Optimizely SaaS CMS - all during just a break between coffee refills.

Background
Recently, I had the pleasure of participating in the Optimizely Hackathon 2024 and leading a team in building a project that explored Optimizely's newest product — SaaS CMS. It aims to cut out heavy backend dependencies, letting editors build websites with just frontend components.
As this was a new product for us, we decided to build a fully functional site with the core of SaaS CMS and see how it differs from traditional PaaS. One of the must-have features was a listing page that would provide an interactive way to find entities saved in our data store. This seemed like a big challenge from the start. We knew from experience that building a search function is a huge, time-consuming task. And time was crucial here. Since it was a hackathon, it was limited — at the beginning, we didn't even know how much we had it.
One key consideration was how to index content without the Search and Navigation module available in SaaS. GraphQL seemed like a potential solution, but we were searching for a more time-efficient option. Fortunately, apart from access to SaaS, we also got a license to Coveo, a platform that allows content indexing and retrieval via GraphQL, along with a powerful search API. While this resolves the indexing challenge, the task of building the search UI still remains.
At this point, we discovered Coveo's Search Page feature — a powerful tool for building listing pages. It offers all the essentials: free-text search, filters, pagination, and sorting. With just a few clicks, we had a fully functional search interface. The final step was simply injecting the JavaScript snippet into our code, which immediately loaded the search functionality onto our website.
Let me take you on a journey to show what we built and how we did it.
Step 1: Configuring the Data Source
The first step is configuring the data source, which can be multiple depending on the needs. We used two sources: one for Job Offers and another for Candidate Profiles, as we wanted to provide two separate listings.
Creating a source happens in the Content → Sources section. Where after clicking "Add source" there are many of the existing and ready-to-use connectors. In our case, we were interested in the Optimizely GraphQL connector.
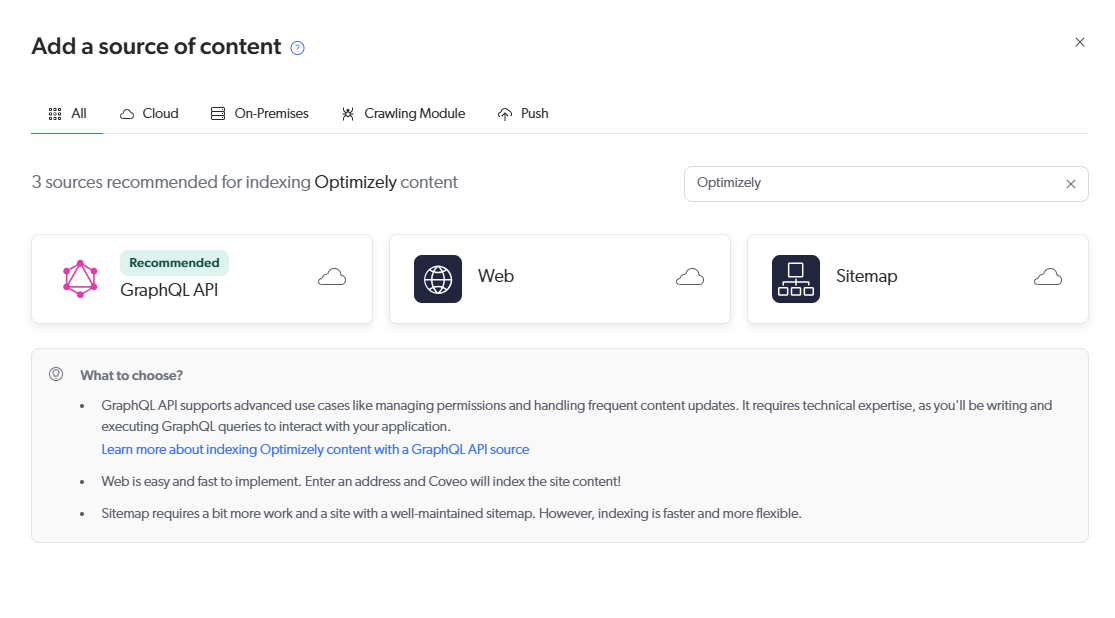
Once the source type is chosen, the setup modal appears, presenting three main tabs:
Authentication - Here, access credentials are entered. These can be located in the SaaS CMS dashboard underneath the Render Content header. The "App key" should be used as the username, and the "Secret" as the password within Coveo's "HTTP, Basic, Kerberos, or NTLM authentication (optional)" field.
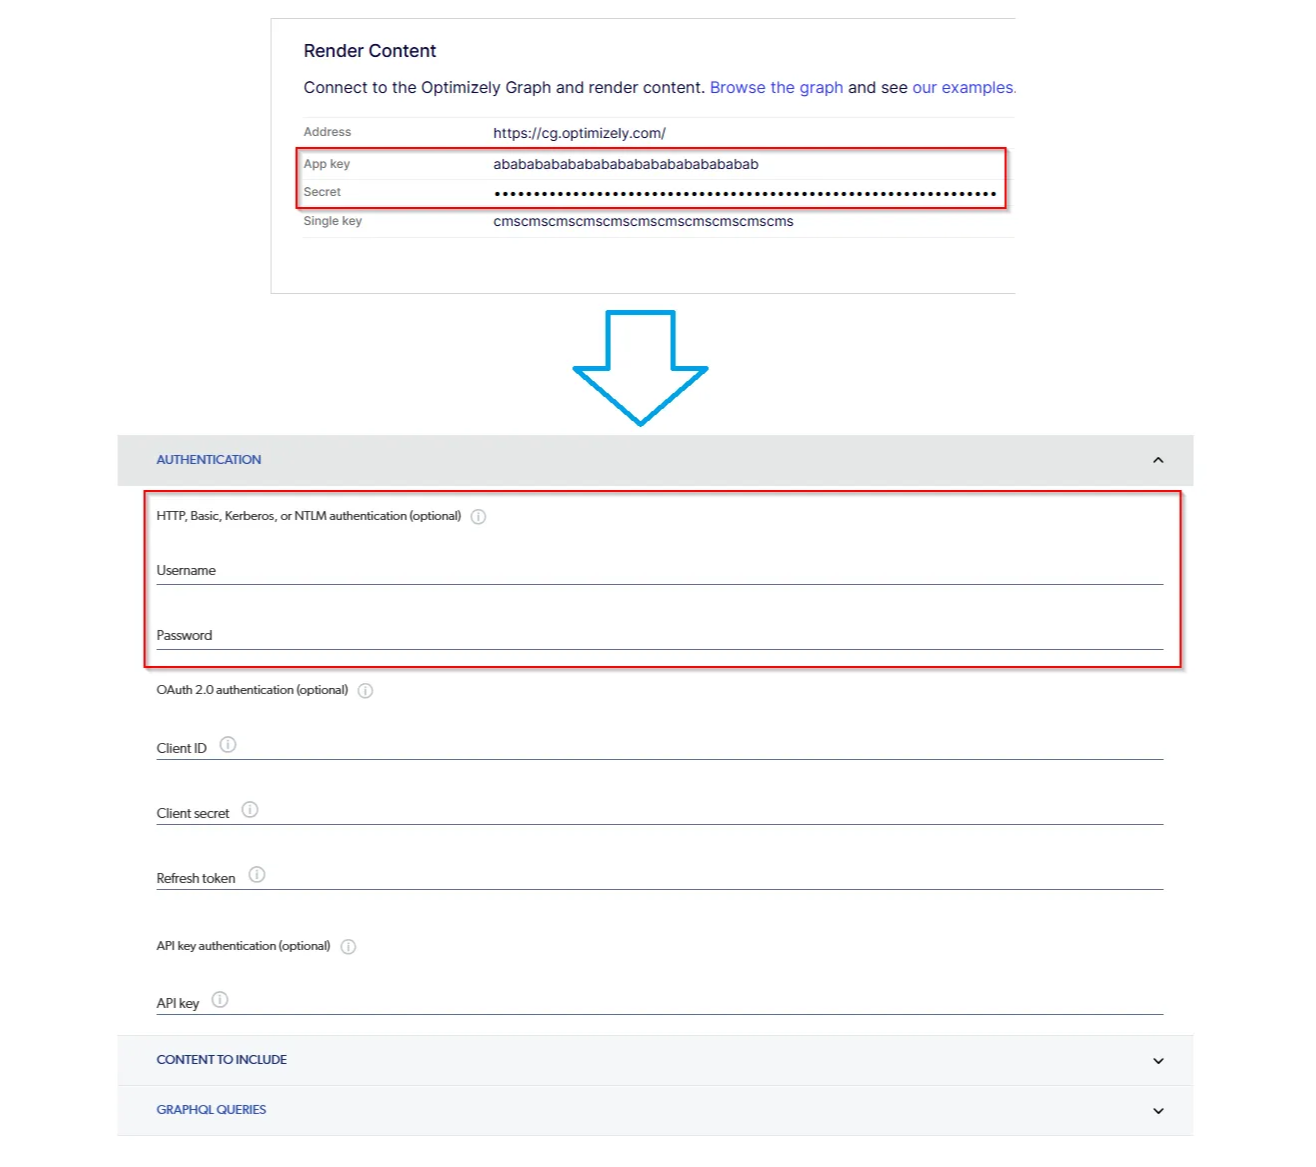
Content To Include - This section contains a JSON-based configuration of the data source. For basic use, only a few essential fields are needed:
{ "services": [ { "url": "https://cg.optimizely.com/", "authentication": { "username": "@username", "password": "@password", "forceBasicAuthentication": "true" }, "endpoints": [ { "path": "content/v2", "method": "GET", "paging": { "pageSize": 10, "offsetType": "item", "totalCountKey": "data.JobOffer.total" }, "itemPath": "data.JobOffer.items", "itemType": "JobOffer", "uri": "%[_metadata.url.base]%[_metadata.url.default]", "clickableUri": "%[_metadata.url.base]%[_metadata.url.default]", "title": "%[_metadata.displayName]", "modifiedDate": "%[_modified]", "queryParameters": { "query": "@getJobListingQuery" } } ] } ] }The authentication values from the previous section are automatically injected.
Pagination can be set so the source fetches data in batches.
The URL to the item must be constructed from the metadata fields of the CMS page.
The GraphQL query is referenced via a variable name.
Using %[string] syntax, data can be dynamically referenced for indexing metadata.
The "JobOffer" text must be replaced with the destination CMS page type name.
GraphQL Queries - Here, the query is defined to retrieve all necessary data. Its name is referenced in the previous section. In our case, we used it to extract details about Job Offers.
query JobListingQuery {
  JobOffer(locale: en, skip:@offset, limit:@pageSize) {
    total
    items {
      Description {
        html
      }
      Company
      Title
      RequiredSkills
      Location
      Salary
      _metadata {
        displayName,
        url {
          default,
          base
        }
      }
      _modified
    }
  }
}
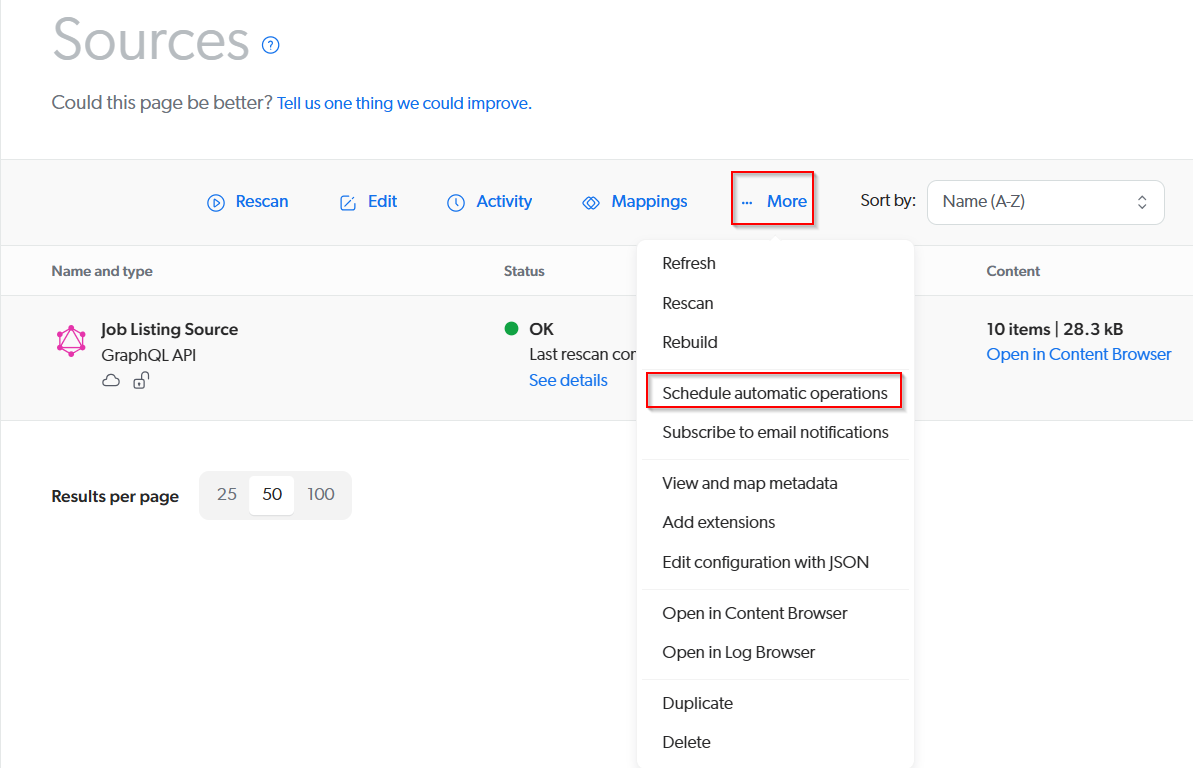
From this point, an index can be built. Another thing worth doing is to set up automatic rebuild in recurrence time frames, so data is always fresh. This can be achieved by selecting the source in the Sources list and clicking "…More".
Step 2: Mappings
Once the data is fetched, the next step is mapping the necessary fields. For example, in our Job Offers listing, we needed fields like required skills, a company name that published the offer, salary, and location. These fields would later enable us to build filter options, allowing users to quickly find relevant offers.
To set up mappings, the desired source must be selected in the Sources section. This reveals a Mappings button in the top bar. Clicking this opens a modal where default mappings are viewed and new ones can be added by clicking the "Add Mapping" button. This will bring up a separate modal where new mappings can be configured.
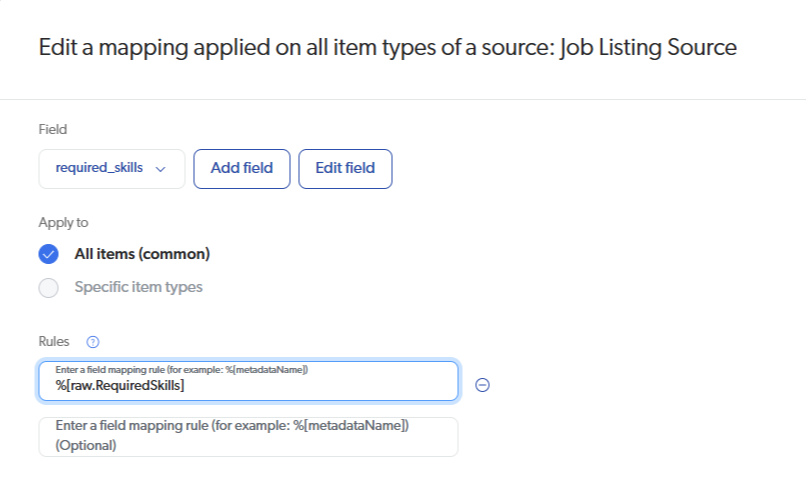
In the mapping modal, existing fields can be chosen or a new one can be created. For instance, we created a new field named "required_skills". Many configuration options are available in the field modal, such as setting the field as a multi-value facet or enabling it for free-text searches.
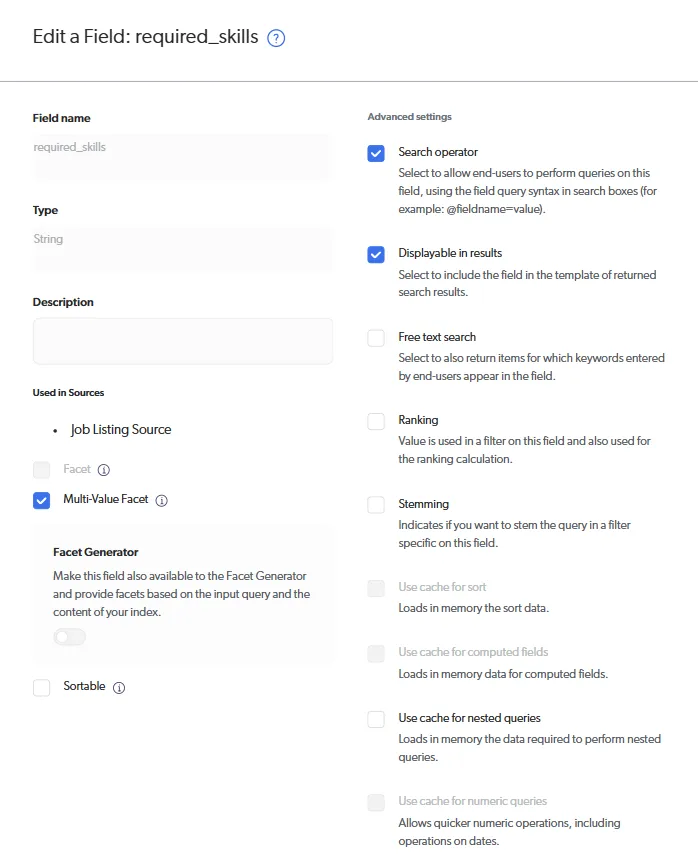
After selecting a field, it is required to create a mapping rule, which points to a specific data property in the JSON response from the GraphQL query. For required skills, which are stored as an array of strings, the mapping rule looks like this: %[raw.RequiredSkills].
In most cases, the mapping rule is simply a property name wrapped in %[]. However, it can vary for more complex fields - such as URLs, where we used %[raw._metadata.url.base], or rich text fields, where we used %[raw.Description.html]. Note that data from GraphQL is stored within the raw object.
Step 3: Designing Search Page
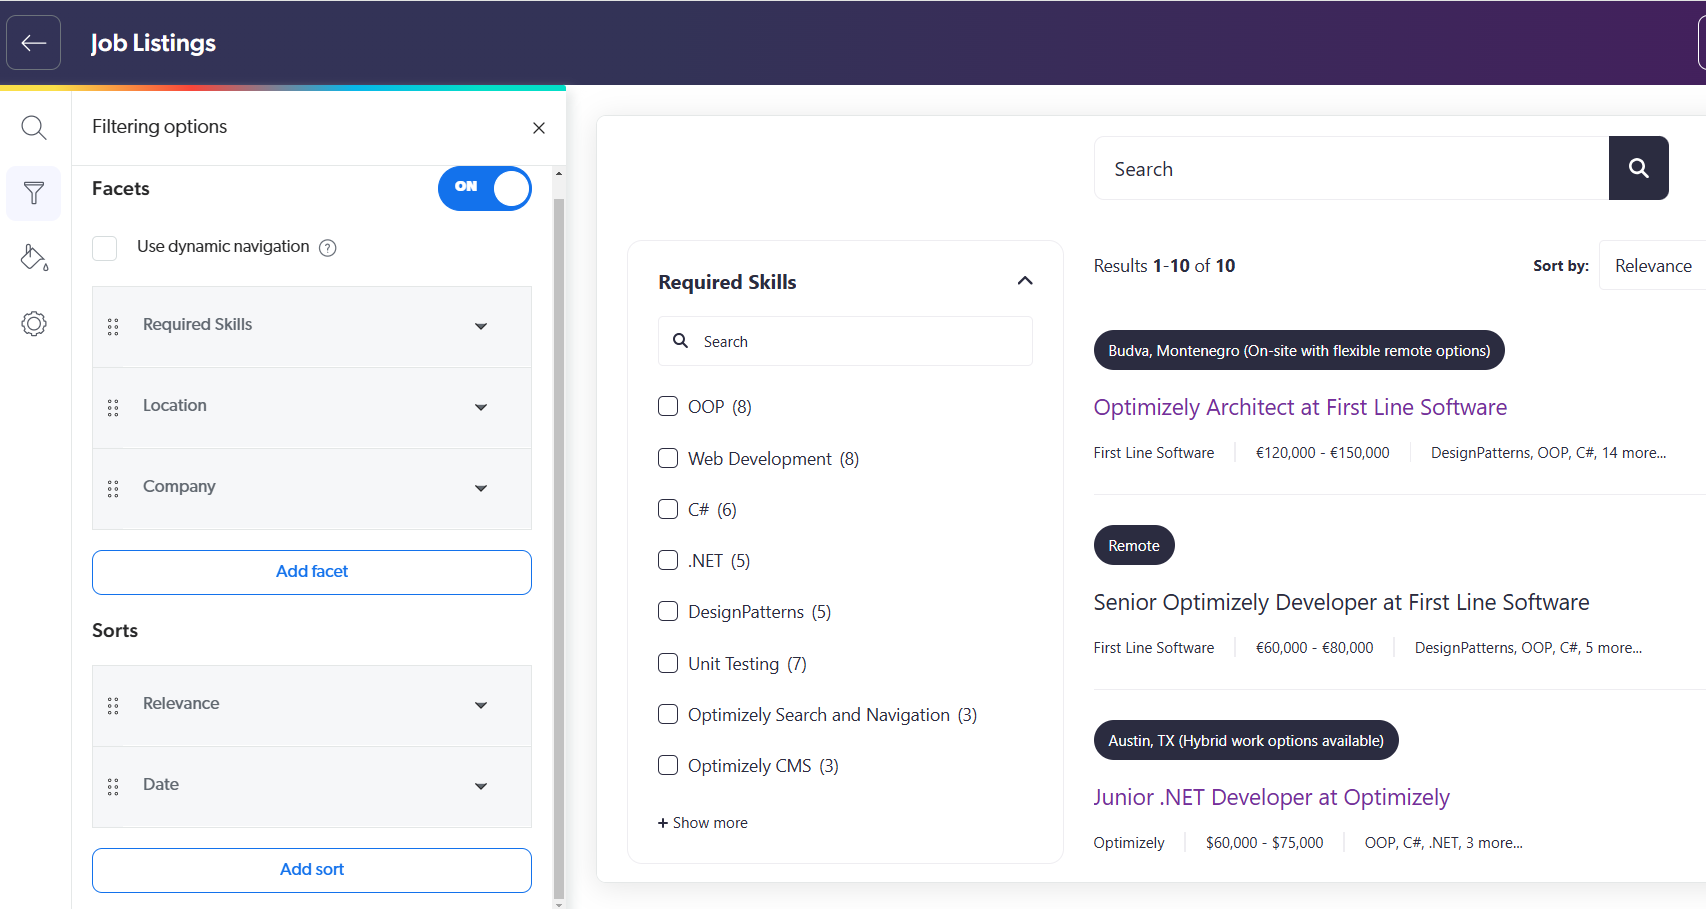
With the data in place, it's time to build the search page. The page creator can be found under Search → Search Pages, where the type of builder needs to be selected. We opted for the recommended Simple Builder, which allows for easy configuration of layout, styles, and, most importantly - filters. These settings are organized into separate sections:
Search results display - Here, it is possible to configure the layout of result items (list or grid) and choose which data to display. Each result item has two primary display areas. The first is a colored badge, which highlights a single-faceted data field. For example, we display the location here. The second display area, at the bottom of the item, is for additional details, where both single and multiple facets can be shown. In our case, we included the company name, salary range, and required skills, creating a clear, and readable result item.
Filtering options - This section enables setting up filters and sorting options using fields defined in the mappings step. In our case, we wanted to allow filtering by skills, location, and company.
Style - This section adjusts colors and font families for the entire listing page, ensuring that the page aligns with the overall design.
Settings - Here, one can find a code snippet to copy and paste into the desired location on the website. Additionally, there’s a placement input field where it is possible to specify the CSS selector for the container where the listing should appear. Since we integrated the search feature within the CMS page, we specified ".search-page" as the container selector overriding the default "body" selector.
Step 4: Injecting the Search Page
With everything set up, the final step is to render the listing on the CMS page. Before copying the embed script tag from the Settings section in the Search Page Builder, it is required to create an API key.
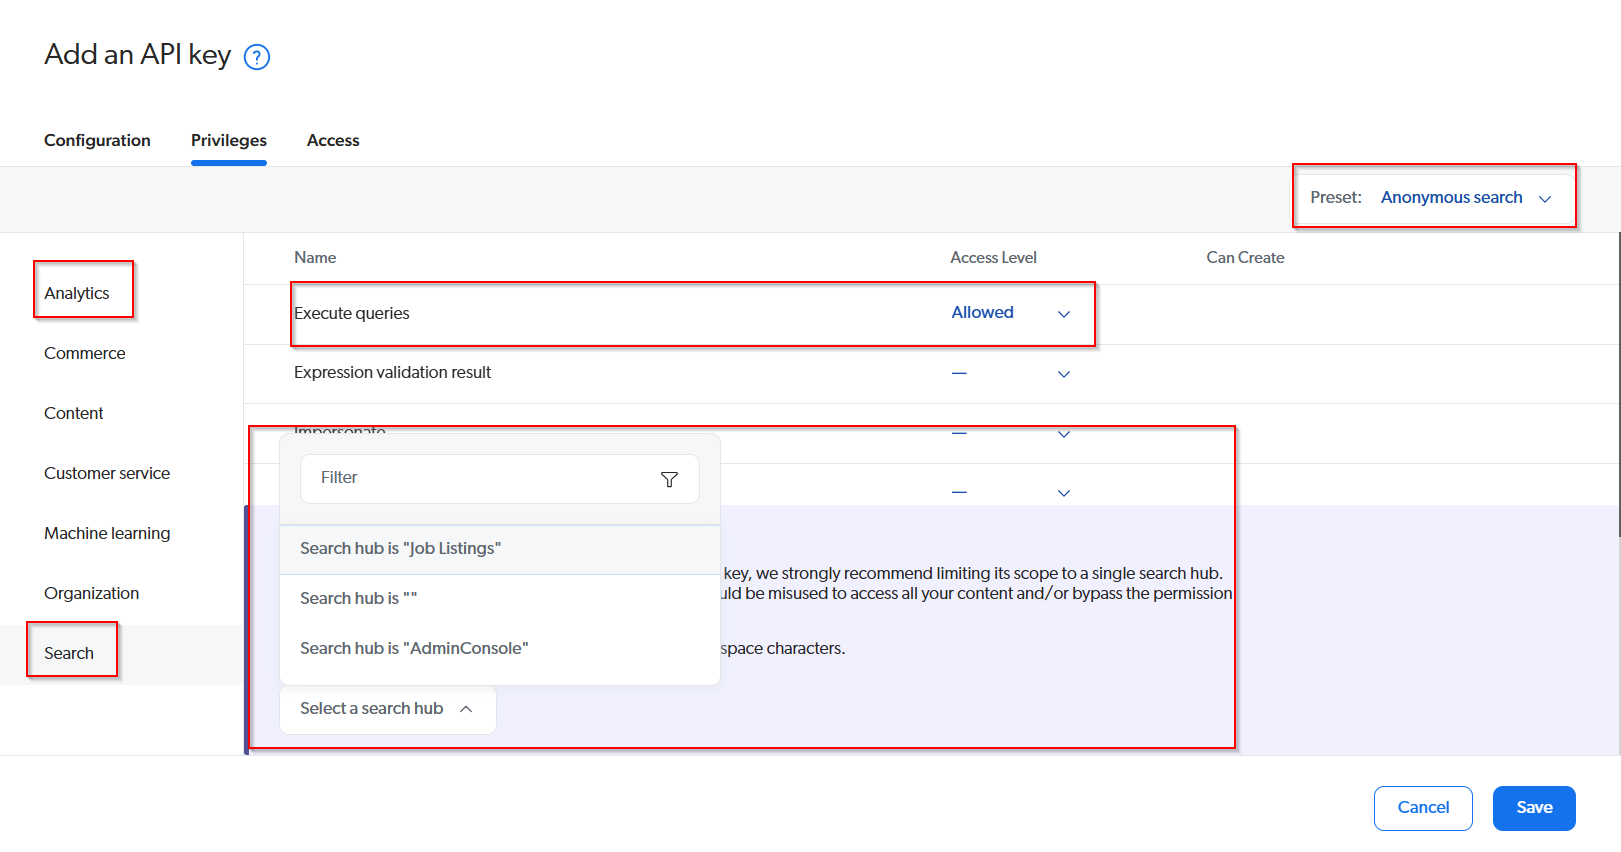
This can be done in the Coveo Dashboard under Organization → API Keys. In this section, a new key can be added, specifying a name and, more importantly, configuring the necessary access rights in the Privileges tab. For a search page, the following permissions must be set:
Execute Queries access to "Allowed"
Analytics Data access to "Push".
These permissions can be set manually in the Analytics and Search subtabs, or the Anonymous Search preset can be used, which configures them automatically.
Additionally, it’s recommended to follow the warning prompt to limit the key’s scope by selecting the appropriate Search Hub name - an identifier automatically generated and visible in the Search Builder's settings.
After saving the key settings, its value will only be visible once, so it’s crucial to save and paste it into the script snippet from the Search Builder.
The raw HTML embed code should look something like this:
<div class="search-page">
	<script
		async
		onload="CoveoSearchPage.initialize('API_KEY')"
		src="https://search.cloud.coveo.com/rest/organizations/{orgId}/searchpage/v1/interfaces/{pageId}/loader"
	/>
</div>
If the app is built with Next.js, as ours was, this reusable client component can be used.
'use client';
import Script from "next/script";

export const CoveoSearchPageInitScript = ({src, apiKey} : {src: string, apiKey: string}) => {
    return <div className="search-page">
       <Script
          onLoad={() => {
             // @ts-ignore
             CoveoSearchPage.initialize(apiKey)
          }}
          src={src}
       ></Script>
    </div>
}
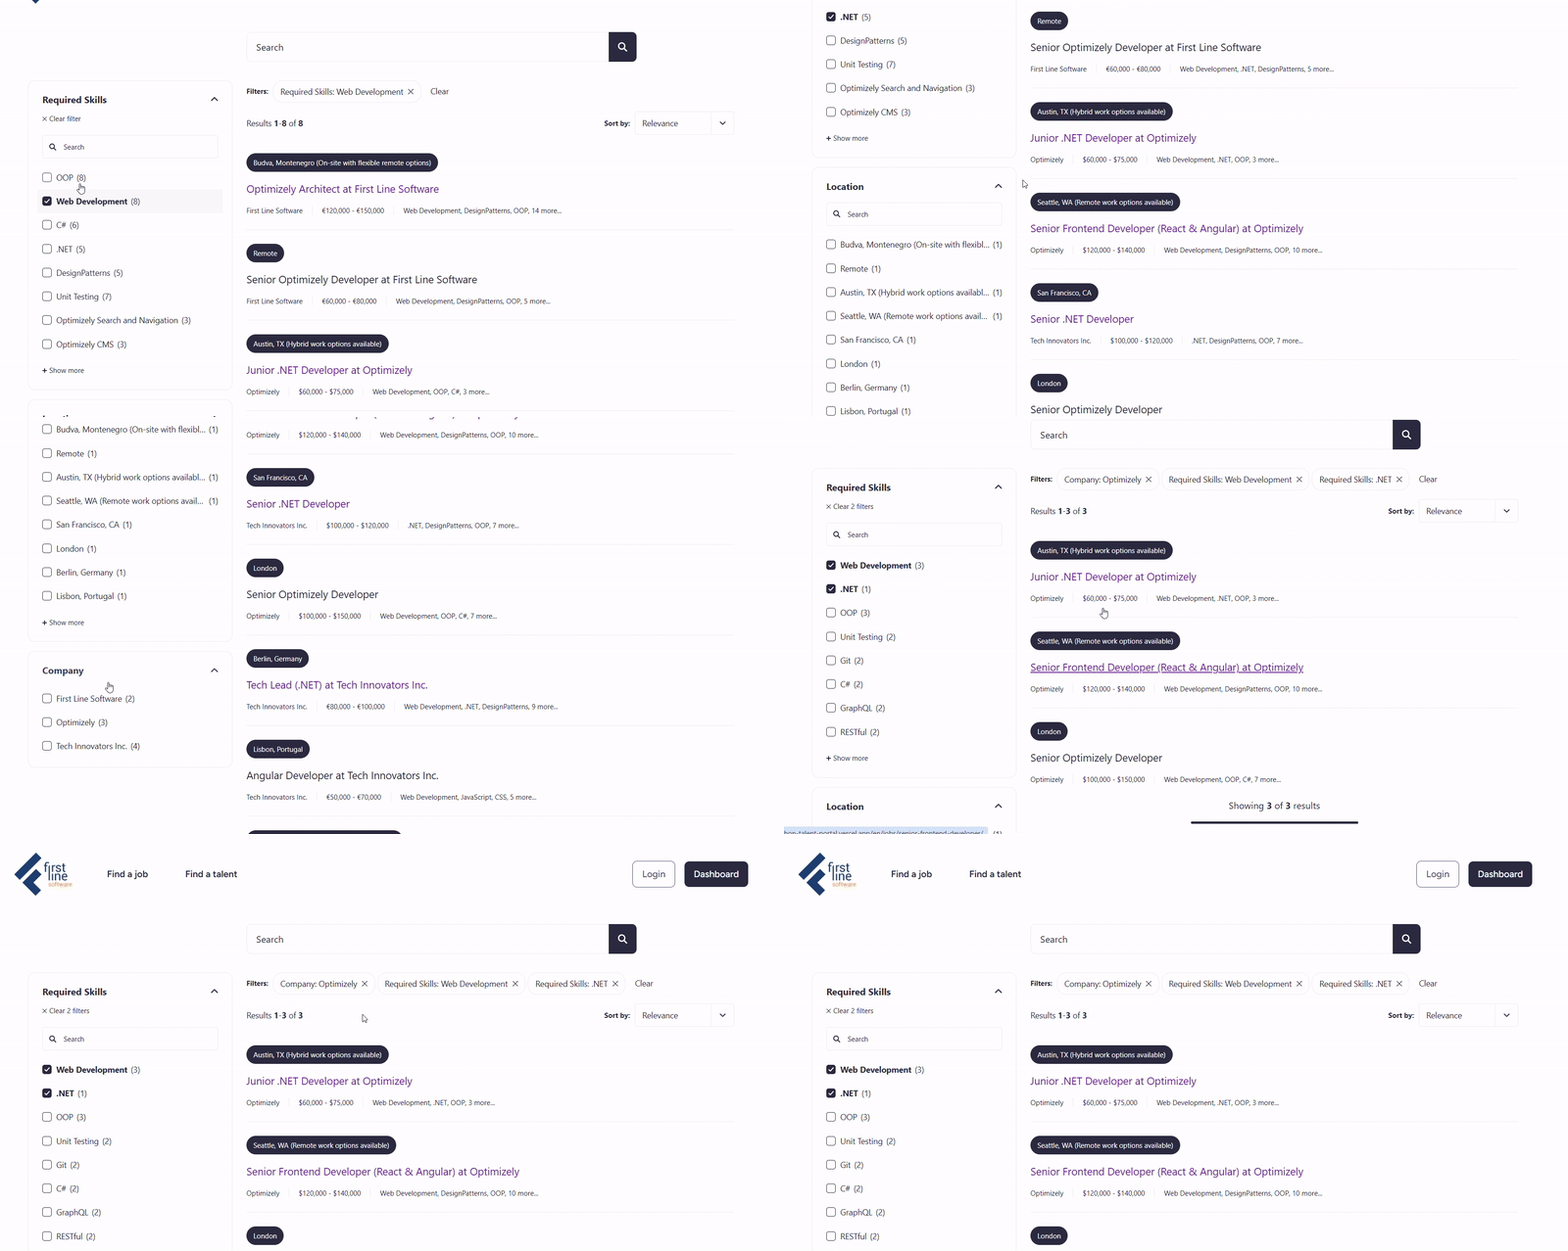
After copying and pasting the code, the fully functional listing page will be ready for use.
Optional step: Dealing with multiple sources
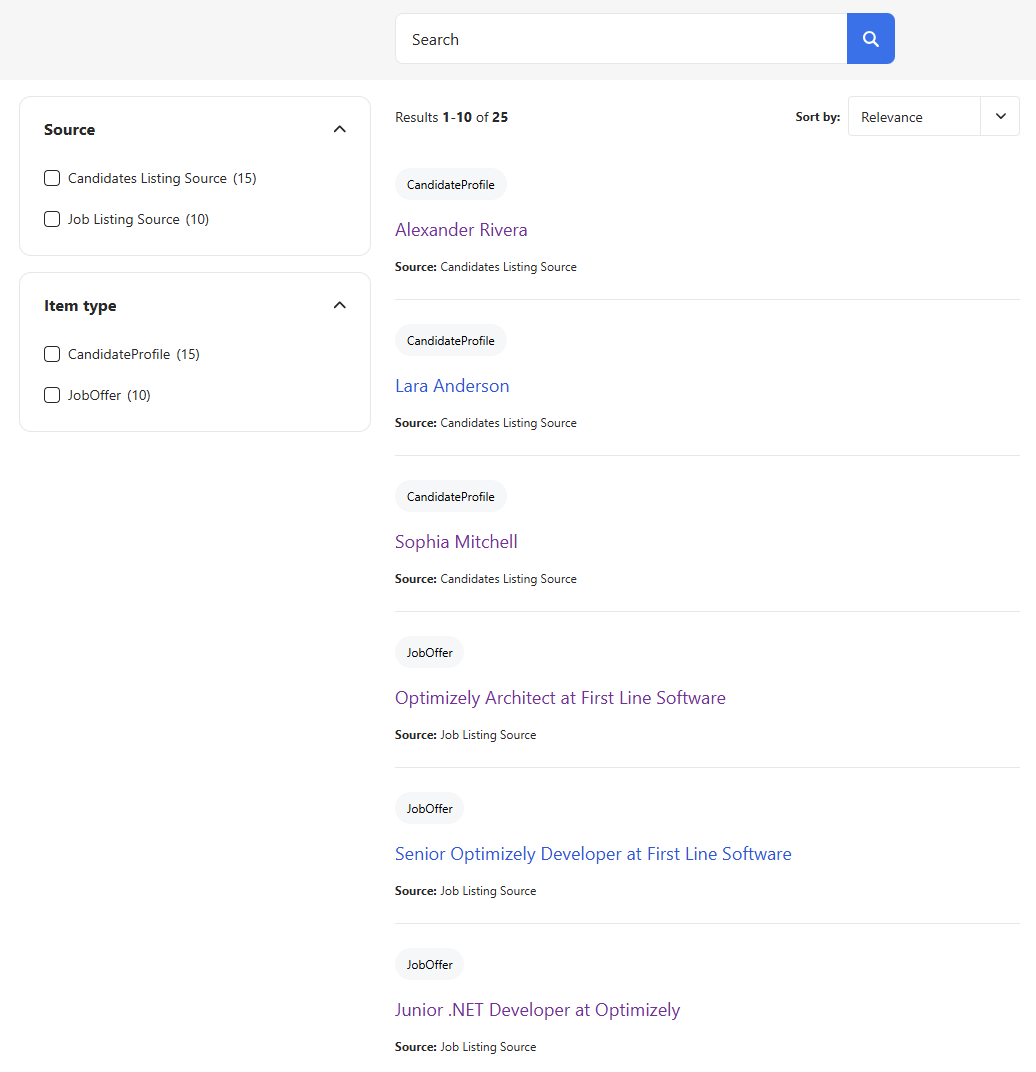
After adding a new source, existing search pages may appear broken - suddenly displaying data from all sources rather than only the intended one.
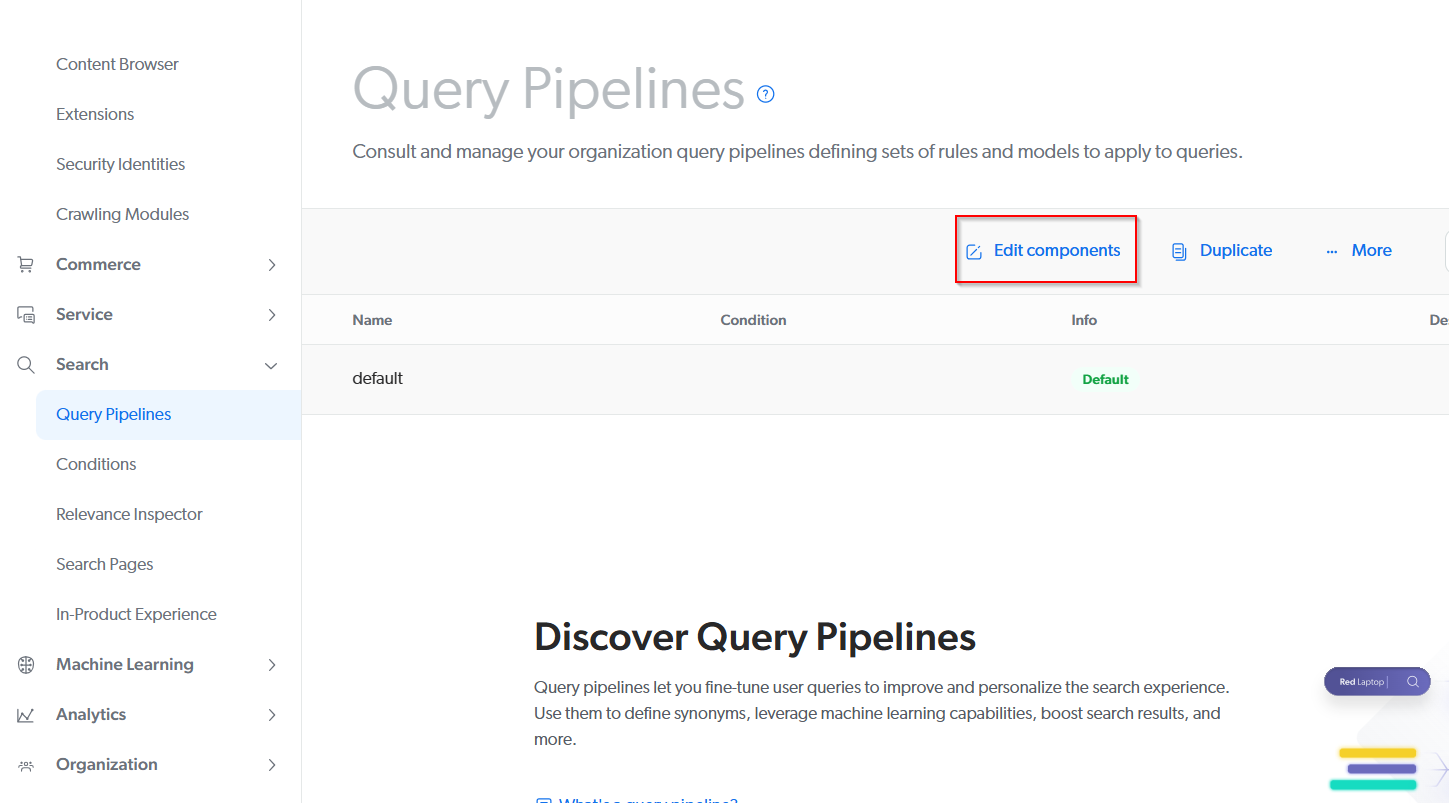
To resolve this issue, configure Coveo to direct the data flow by modifying the default Query Pipeline. This can be done by navigating to Dashboard → Search → Query Pipelines, selecting the "default" pipeline, and clicking "Edit components".
In the newly opened window, it is needed to go to the Advanced tab to add a new Filter rule. In the Filter creation modal two things must be configured for each combination of the source and the search page:
In the Content that matches section, set up a logical condition that the "source" field matches the desired source name.
In the Condition (optional) section, add a condition to match a Search Hub using the desired Search Hub name, as referenced in the Search Builder’s Settings section. For accuracy, it may be best to copy the name directly from the Builder and paste it into the condition creator.
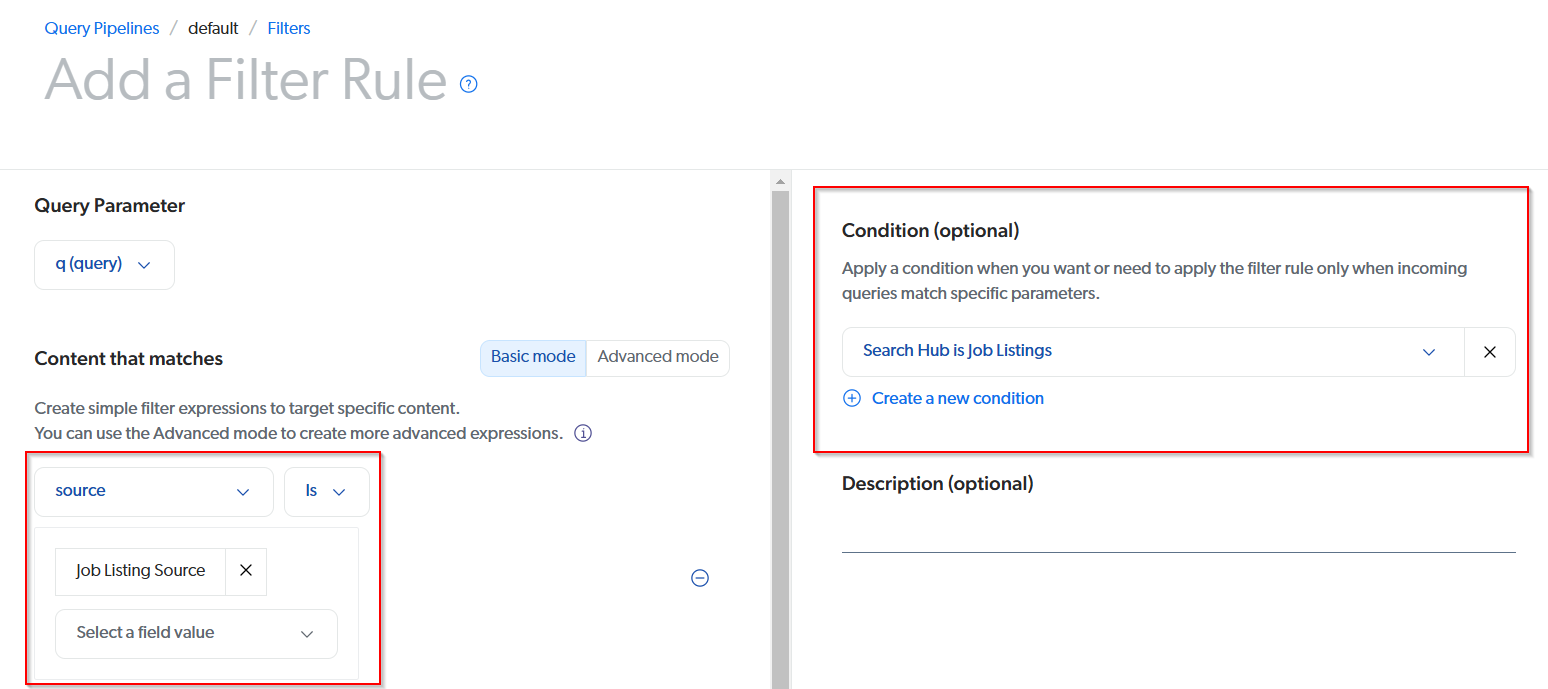
These custom filters ensure that data flows to the correct locations.
Summary
As shown above, even advanced features like a search page can now be implemented easily and quickly, even in several minutes. All it takes are well-suited cloud products like Optimizely SaaS CMS and Coveo, along with minimal configuration. The future truly is now.
This article was created with the support of Wim Nijmeijer from Coveo. His insights and extensive knowledge were essential in ensuring the accuracy and quality of the content.
More details about the Coveo connector for Optimizely SaaS CMS can be found in the documentation.
More articles

Indexing Geta Categories in Optimizely Graph
Different ways to fully use categories in headless architecture.

Optimizely CMS Mixed Auth - Okta + ASP.NET Identity
Configuring mixed authentication and authorization in Optimizely CMS using Okta and ASP.NET Identity.

Cancelling CMS Scheduled Jobs
From flags to tokens: making Optimizely CMS scheduled jobs more elegant with .NET cancellation tokens.